The standard Roadster is 30mm higher than the Brabus Roadster so I had to lower the car to improve the handling having changed the wheels and adding spacers which had already widened the track of the car.
I fitted the Bilstin PPS1 Streeline kit which is similar to that of the Brabus but the ride is a little bit harder as the springs are different. As I understand it, the brabus Bilstien suspension never settled and the Streetline kit springs do, so ending up slightly lower than the Standard Brabus.
Something to note is that my pads were 2 and a half years old and they had desintegrated, the pads detached from their backing plates and fell out of the caliper so you may need new pads on the front which cost me £20 as I am waiting for the Brembos to arive, it may be worth changing your discs and pads at the same time.
Make sure you have a trolly jack, at least 1 jack stand and a small siccor jack (found in most cars) which you can use to jack up the hub assembly to line up the bottom bolt with the bottom of the damper to help you get the bolt back through and an E14 torx socket for this centre bolt (random technique helped alot).
For the rear, you need a torx socket set, 16mm socket (x2) or 16mm spanner (x2), to remove the top bolts on the rear damper.
It was simply a case of;
Jacking up the car, jacking point shown below for rear...


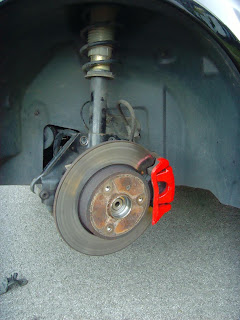
...removing the wheels... (avec cat) + remove spacers if you need to, 15mm socket for wheel bolts...

undoing all the top and bottom bolts that hold the damper in place (16mm spanner and adjustable wrench)...


...and then 16 stone of pure... ahegm... muscle standing on the hub to removing the springs watch your fingers here...

...you could use a spring compressor (shown above) but takes ages to fit wind etc, but if your on your own youll need this, repeat for fitting new springs (thicker ones on the back) again watching your fingers...

...fit the new dampers the same way as you removed the old ones, note the jack under the hub, which we used to line up the hub and bottom of the damper making it easier to get the lower bolt back in...

Put your spacers, adapters, wheels back on, be sure to tighten the wheel bolts to 118NM with your torque wrench.
One last thing to note for the rears, if you have a venom or viper induction kit and your SAM has been moved over to the left side of the engine bay, you will need to take it off its bracket and slide it towards the back of the engine bay to get the top bolt out of the damper on the left side (see below illustration)...

For the front be sure to buy the bolts from Merc @ £2.70 Inc.vat (no. 17 on the suspension diagram on their parts computer system), the ones that go through the discs into the bottom of the dampers, you might aswell buy two new dust caps for the hub while your there unless your careful when removing the ones on the car.
Jack up the car and remove the wheel, then remove the two bolts with a torx socket and release the bracket holding the strut to the hub.

Then, remove the dust cap with a thin screwdriver or other thin tool, a hammer is useful to help jimmy it off (removed in pic above and below). Then remove the centre bolt (Removed in the piccie below) using the E14 Torx socket bit, one of mine was on tight as a bugger so you'll need a large torque wrench to get these off, try not to round off the head as I did, as then its a nightmare, special sockets to remove rounded off bolt hads were needed!! The hub will then drop down and you need to remove the top nut...

The front spring is over the damper (Coilover) on the front and you have to take this apart to re-use the cups on the Streetline Kit. Just take it apart carefully as the spring is under load, then we just pushed the new spring over the damper and hand tightened the nut... 

...(open the bonnet) using a 21mm recessed ring spanner and 7mm alen key, either that or a 46mm apanner to hold the damper still under the plactic jacket whilst still using the 21mm recessed ring spanner to release the top end of the damper. These tools are specialist tools and nowhere sells them on the weekend, as I found out after trying to buy them from about 10 different tool shops, definately buy these before you start as they are not part of normal tool sets, so unless your a mechanic you wont have one in your garage/shed.
The front spring is over the damper (Coilover) on the front and you have to take this apart to re-use the cups on the Streetline Kit. Just take it apart carefully as the spring is under load, then we just pushed the new spring over the damper and hand tightened the nut...
...so at no point did we use spring compressors during this mod, which you may need if your not 16 stone however, you need small ones to fit under the arches.
Use the new 22mm nut (supplied with streetline kit) or the 21mm nut and put the dapmer with new spring in situe back on top first, and do up the bolts nice and tight, secondly replacing the long hub bolt with the new one you have hopefully already purchased tighten to 120nm (good idea to use the scissor jack again if you need to to line up the bolts, however it stays in place a bit better on the front and we didn't have to use it for the fronts). Put the wheel back on and tighten the wheel nuts to 118nm, if you dont have a torque wrench buy one.
Do one side at a time and you may need to put a block of wood or brick under the wheel so that when you lower the car you can get the trolley jack out (unless you just lift it up like we did!!)and the car will now be lowered... job done.
No comments:
Post a Comment