Welcome to Smart Roadster ownership...

This is the history of my Smart Roadster to the present day, that will be constantly updated with information that you will hopefully find useful and informative throughout your Roadster ownership... enjoy ;-)

Monday 13 August 2007

Re-map

August 2007...

Travelled the 360 mile round trip to Red Dot Racing in Watford next to Smart Arse Design to get the car custom re-mapped.

There are lots of set remaps out there by companies such as SW Exclusive, Smarts R Us, Smarts for U, Dealers, MC Smarts, Big Performance, and many others. A lot of these re-maps dont have smooth power curves and have a large amount of power early on then tail off which isn't always the most pleasant drive and having experienced a couple of these re-maps before I decided to get a custom one.

Red Dot is the only placve I know of who do custom re-maps for smart at this time in the UK so there was only one choice, and I have used them before so I know they provide an excellent service.

As I have completed induction and exhaust modifications, I think this was the best option to get the most power from the car.

After approximately 2 1/2 hours and a bit of tinkering I got 107 bhp (see below) which will probably settle at about 112-115 bhp when the re-map has bedded in which will take about a week. It's not the easiest to read but the new figures are the dark lines black being bhp and the blue torque so as you can see good gains. It should be noted that rolling roads need to be calibrated specially for smart roadsters to account for the loss from the fly to the wheels, and people find that their cars vary wildly on different rolling roads, so the best thing you can do is get out there and do some 1/4 mile runs to see how quick your car is in reality.


I also had the revs raised in manual from 6,000 rpm to 6,500 rpm, this is much better as the car reaches approximately 62-64mph before wanting to change gear rather than the 58mph it used to reach. This means one less gear change and consequently a quicker 0-62mph time.

So long as the car doesn't trip into safe mode, I will be going back to have the re-map twaeaked to produce in the region of 120-125 bhp. This is waht a tuned Brabus' puts out when modified (max 130 bhp), so I can't complain at these results from a standard roadster!

I can now accelerate in 6 gear from 75 mph and the car will go on to a dizzying 130mph'ish', as opposed to 115 mph as standard, it has made the drive much more pleasant with longer gears and a a heck of a lot better on the motorways.

Details of bhp of bedded in custom re-map to follow and hopefully tweaked figures... watch this space.

Tuesday 31 July 2007

Suspension

July 2007...

The standard Roadster is 30mm higher than the Brabus Roadster so I had to lower the car to improve the handling having changed the wheels and adding spacers which had already widened the track of the car.

I fitted the Bilstin PPS1 Streeline kit which is similar to that of the Brabus but the ride is a little bit harder as the springs are different. As I understand it, the brabus Bilstien suspension never settled and the Streetline kit springs do, so ending up slightly lower than the Standard Brabus.

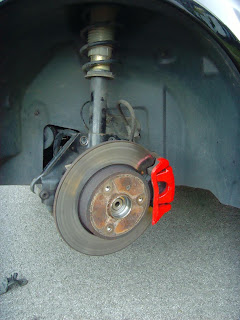
Something to note is that my pads were 2 and a half years old and they had desintegrated, the pads detached from their backing plates and fell out of the caliper so you may need new pads on the front which cost me £20 as I am waiting for the Brembos to arive, it may be worth changing your discs and pads at the same time.

Make sure you have a trolly jack, at least 1 jack stand and a small siccor jack (found in most cars) which you can use to jack up the hub assembly to line up the bottom bolt with the bottom of the damper to help you get the bolt back through and an E14 torx socket for this centre bolt (random technique helped alot).

For the rear, you need a torx socket set, 16mm socket (x2) or 16mm spanner (x2), to remove the top bolts on the rear damper.

It was simply a case of;

Jacking up the car, jacking point shown below for rear...

...removing the wheels... (avec cat) + remove spacers if you need to, 15mm socket for wheel bolts...


undoing all the top and bottom bolts that hold the damper in place (16mm spanner and adjustable wrench)...


...and then 16 stone of pure... ahegm... muscle standing on the hub to removing the springs watch your fingers here...

...you could use a spring compressor (shown above) but takes ages to fit wind etc, but if your on your own youll need this, repeat for fitting new springs (thicker ones on the back) again watching your fingers...
...fit the new dampers the same way as you removed the old ones, note the jack under the hub, which we used to line up the hub and bottom of the damper making it easier to get the lower bolt back in...
Put your spacers, adapters, wheels back on, be sure to tighten the wheel bolts to 118NM with your torque wrench.
One last thing to note for the rears, if you have a venom or viper induction kit and your SAM has been moved over to the left side of the engine bay, you will need to take it off its bracket and slide it towards the back of the engine bay to get the top bolt out of the damper on the left side (see below illustration)...


For the front be sure to buy the bolts from Merc @ £2.70 Inc.vat (no. 17 on the suspension diagram on their parts computer system), the ones that go through the discs into the bottom of the dampers, you might aswell buy two new dust caps for the hub while your there unless your careful when removing the ones on the car.

Jack up the car and remove the wheel, then remove the two bolts with a torx socket and release the bracket holding the strut to the hub.


Then, remove the dust cap with a thin screwdriver or other thin tool, a hammer is useful to help jimmy it off (removed in pic above and below). Then remove the centre bolt (Removed in the piccie below) using the E14 Torx socket bit, one of mine was on tight as a bugger so you'll need a large torque wrench to get these off, try not to round off the head as I did, as then its a nightmare, special sockets to remove rounded off bolt hads were needed!! The hub will then drop down and you need to remove the top nut...

...(open the bonnet) using a 21mm recessed ring spanner and 7mm alen key, either that or a 46mm apanner to hold the damper still under the plactic jacket whilst still using the 21mm recessed ring spanner to release the top end of the damper. These tools are specialist tools and nowhere sells them on the weekend, as I found out after trying to buy them from about 10 different tool shops, definately buy these before you start as they are not part of normal tool sets, so unless your a mechanic you wont have one in your garage/shed.

The front spring is over the damper (Coilover) on the front and you have to take this apart to re-use the cups on the Streetline Kit. Just take it apart carefully as the spring is under load, then we just pushed the new spring over the damper and hand tightened the nut...

...so at no point did we use spring compressors during this mod, which you may need if your not 16 stone however, you need small ones to fit under the arches.

Use the new 22mm nut (supplied with streetline kit) or the 21mm nut and put the dapmer with new spring in situe back on top first, and do up the bolts nice and tight, secondly replacing the long hub bolt with the new one you have hopefully already purchased tighten to 120nm (good idea to use the scissor jack again if you need to to line up the bolts, however it stays in place a bit better on the front and we didn't have to use it for the fronts). Put the wheel back on and tighten the wheel nuts to 118nm, if you dont have a torque wrench buy one.

Do one side at a time and you may need to put a block of wood or brick under the wheel so that when you lower the car you can get the trolley jack out (unless you just lift it up like we did!!)and the car will now be lowered... job done.

Brakes

June/July/August 2007...

I ordered a set of Brembo gold, drilled front discs and pads, paid for them on the 26 June 2007 expecting a 7-21 day wait for delivery from Italy where they are made to order... 5 weeks later and the pads have arrived but the discs are still on back order, I hope they are worth the wait... 8 weeks in and apparently the Itallians go on holiday in August, but the two weeks before and after are treated in the same way!!

I'm not waiting any longer... so I got some Tarox Japan Sport slotted/grooved and drilled discs with green stuff pads (see below), they are excellent. I would reccomend them but maybe only grooved/slotted ones as the holes take a way surface area in contact when braking and could be detrimental, also there is the possinility of the discs cracking but time will tell.


Think I'll go for the Red-Dot slotted discs when these wear out.

Thursday 19 July 2007

Body Styling

July 2007

Yey... I won a Brabus side skirt on e-bay they retail at £180 (Inc Vat) from Merc. Didn't get it for as cheap as I would have liked but hey, still a reasonale bargain.

One down.... one to go!

Wheels & Spacers

July 2007...

Well it had to happen, ideas for the outside had started to take over my consiousnes and I had to do something about the exterior of the car...

These months were mostly spent coming to terms with how to fit wheels on the car that were not the standard three stud pattern, and deciding on what the best rubber (tyres) would be to keep me on the tarmac rather than in the fields!

I started my search for some lightweight 17" wheels, as I figured the more rubber on the reoad the batter the grip, well in the dry anyway. Lot's of people like the 16" Spikelines but they are not for me.

I soon discovered that it was not that simple and there were lots of things to consider;
  • Wheel Width
  • Offest
  • Tyre Size
  • Centre Bore Size
  • Hub Size
  • Spigot Rings
  • 3 to 5 Stud Adapter/Spacers

I did a fair bit of research and I'm now and expert in all of the above, but I can't be bothered to bore you with the details as I don't want to wear my fingers to the bone typing it all... so ill just cut to the chase the 3 to 5 stud adapter/spacers to widened the track 65mm rear and 15mm front...

and I got these wheels...


The wheels weigh 2kg more each including the tyres (Yokohama Prada) so added 8kg to the car which isn't bad for 17" wheels.

Ice

May 2007...

So now I had a what appeard to be standard Roadster Coupe from the outside with the terribly average factory headunit and very basic speakers, which don't get me wrong, are ok, unless you have the roof down or intend driving at over 60mph!!

So... a nice bloothtooth capable (handsfree driving) Pioneer headunit went in with 12.5cm Raindown front component speaker set (speakers 60mm deep, with tweeters mounted on 'A' pillar speakers in factory positions) + crossovers, with an Apline active sub woofer located behind the passenger seat connected to the car battery.

I thought all this would be easy to fit, and with a few umms and ahhs it went in relatively easily and sounds great.

Sorted...

Engine Modifications

April 2007...

The time was nigh for the first round of Mechanical modifications;

Viper Induction Kit
Janspeed Interclooler Pipes (see below)
Brabus 74kw Turbo Intercooler Pipe
Janspeed Stealth Exhaust


(All of these modifications were done by 'Rob' at Smartarse Design in Watford, a long way from where I live, but tried and tested and well worth the trip)

All of these Mechanical Modification are designed to help the car to 'breath' better basically introducing more air to the combustion cycle to make a bigger bang and then expelling it more quickly through a more free flowing exhaust.

There are 3 basic elements to modifying any car;

1. More Air
2. More Fuel
3. Expelling the gasses produced by 1 & 2 more quickly.

1 & 2 are obvious and I now had 1 & 3 sorted, and due to this being a particularly expensive hobby decided to wait before tackling number 2 (More Fuel).

The induction kit produces a lovely sound and twinned with the wastegate chatter and the Janspeed Exhaust which is relatively quiet at low speeds but has a nice bark when under maximum load.

So I now had approximately between 90-95 hp from what was and 83hp 700cc engine as standard... a good start.

The Begining

Feb 2007...

Having sold a Smart Roadster Bluewave Coupe 6 months ago Modified by Smartarse Design) and regretting it terribly it was time to get another roadster, and sharpish...

I found it on Piston Heads advertised at £7,000. It had been advertised for two days so I called offered £6,500 and settled on £6,600!

This is what I got;


Jack Black Roadster Coupe
54 Plate
5,300 miles
Sprots Pack
16" Spikeline Alloy Wheels
Intrrument Pods
Paddle Shift

Jack Black Triden Cell

Picked it up from Chesterfield completely standard, just what I wanted...